



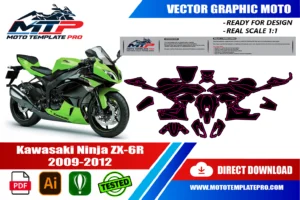
This Kawasaki Ninja ZX-6R 2009-2012 vector template reproduces the Kawasaki Ninja ZX-6R 2009-2012 at real scale (1:1) as an editable vector file.
Table of Contents
Kawasaki Ninja ZX-6R 2009-2012 Vector Template: Overview
Use this Kawasaki Ninja ZX-6R 2009-2012 vector template as an accurate base for decal kits, vinyl wraps, custom liveries and other graphics on the Kawasaki Ninja ZX-6R 2009-2012. It is made for graphic designers, wrap installers and sticker manufacturers.
The Kawasaki Ninja ZX-6R 2009-2012 template covers the 599 cc supersport that many riders remember as the sharp, angular middleweight of its time. Its fairing lines were restyled to echo the bigger ZX-10R, and its exhaust moved from under the seat to a low side position, giving the tail a cleaner, narrower shape than the model before it.
Today these motorcycles are popular second-hand bikes, track-day tools and project machines, which makes them ideal candidates for new graphics. Plastic has aged, paint has faded and many owners want a fresh look that is not simply the original factory colour. A kit designed for the Kawasaki Ninja ZX-6R 2009-2012 can transform the bike.
These editable vector outlines give you the body panels at full size, grouped by part, so you can plan the design on real geometry. They are a starting point for your own artwork and not a finished print file. You decide the concept, the colours and the finish.

The template is provided as an editable vector file, compatible with Adobe Illustrator, PDF and CorelDRAW. It is a starting point for your own design work rather than a finished, ready-to-print graphic: a precise outline of the panels that you can use to position decals, plan a wrap layout or prepare a sticker kit at the correct scale. For background on why vector files are the standard for wrap and decal production, see the Adobe comparison of raster and vector formats.
Where the Kawasaki Ninja ZX-6R 2009-2012 sits in the ZX-6R timeline
The ZX-6R has been a pillar of the 600 class since 1995. In 2003 a 636 cc version arrived with fuel injection, and in 2007 a 599 cc model with a redesigned engine, frame and bodywork was offered. Those bikes carried their exhaust under the seat, a look that shaped the 2005 to 2008 silhouette.
The Kawasaki Ninja ZX-6R 2009-2012 generation stayed at 599 cc but changed its character. The bodywork was restyled to look more angular, matching the ZX-10R, and the exhaust was carried lower and to the side. Kawasaki also fitted a Showa Big Piston Fork, which gave a more progressive feel under braking, and reported a weight reduction compared with the previous bike.
In 2010, engine refinements arrived, including a slipper clutch, and the front seat was lowered. Sources give less detail for 2011 and 2012, so treat them as part of the same visual family and check your own bike.
The 636 cc engine returned in 2013 with new front and side fairings. That change in the bodywork is the reason this template stops at 2012.
For a graphic designer, this timeline is a map of differences. The exhaust position, the shape of the nose and the tail all changed across the years, so a design built for the Kawasaki Ninja ZX-6R 2009-2012 should be checked against the exact bike in front of you, not against a general idea of a ZX-6R.
The body panels of the Kawasaki Ninja ZX-6R 2009-2012, one by one
Start with the nose, or upper fairing. It carries the headlights and the air intake, and its edges flow into the screen. The side fairings run along the flanks, and the lower fairing, or belly pan, wraps the underside. On this generation, the low side exhaust gives the right-hand lower area a distinct shape.
At the back, the seat unit ends in the tail section, with side panels that are narrow because the exhaust no longer sits under the seat. The front fender and the rear hugger are separate parts that take stripes well. Depending on the version, check how the tank is covered and where the fairing meets it.
Panels worth planning around
- Nose: sharp, pointed and ideal for a number or a bold colour.
- Side fairings: the largest surface and the main canvas for lines and text.
- Lower fairing: good for a contrast colour that grounds the design.
- Tail: a short, narrow end where a simple shape is stronger than detail.
Layers are grouped by part, so you can focus on one panel, hide the rest and check your artwork without distraction.
A useful habit is to photograph each panel flat against a wall with a ruler beside it. The picture shows how thick the edges are, where the curves start and how far the fairing wraps. Compare those photos with the outlines of the Kawasaki Ninja ZX-6R 2009-2012 before cutting.
Livery ideas for the angular Kawasaki Ninja ZX-6R 2009-2012
The lines of the Kawasaki Ninja ZX-6R 2009-2012 are crisp, with straight edges and clear angles. Designs built from sharp geometry work best: diagonal blocks, parallel stripes and wedge shapes that follow the fairing edges. Curved flowing patterns can look soft against this body, unless you use them deliberately as contrast.
Because many of these bikes are used on the road and on track days, consider a split personality: a calm colour on one side, a more aggressive pattern near the nose. A retro-inspired two-tone with a fine contrast line gives an older bike a deliberate, classic look. A white and graphite scheme with one bright accent suits riders who prefer a clean aesthetic.
If you plan a full replica-style paint look, use race-bike structure: numbers on the nose and tail, a main graphic along the side fairings and a clean lower fairing. Invent your own sponsor shapes rather than copying brands.
Remember that sunlight changes colours. Test a swatch on the bike before committing to a large area.
Colour choice can also hide age. Darker, saturated colours tend to look fresher on older plastics than pale tones, while a matte finish reduces the visibility of tiny surface flaws. Gloss accents then draw the eye to the lines you want to emphasise.
Building a kit from the Kawasaki Ninja ZX-6R 2009-2012 template
Open the file at 100 percent, print the nose and one side fairing, and hold the paper against the bike. The outlines are at 1:1, so what you see should match what you measure. If the printout differs, check your printer settings first. Then check whether your bike has non-standard parts.
Keep the original contours on locked layers and build the artwork on separate ones. Add a bleed of a few millimetres on edges that wrap, and keep the cut path on its own spot-colour layer. Add registration marks outside the artwork and convert text to outlines. Use the colour profile supplied by your print shop.
Many bikes of this age have repaired or replaced fairings. If a panel is not the original shape, compare the template to it and adjust the artwork. Number your pieces by position and side, so you never cut two right sides by accident.
Always produce a small proof on real film. Colours can shift between screen, paper and vinyl, and a proof costs far less than a failed full print.
Keep a log of the decisions you make: bleed, laminate type, profile and print date. If you need to reprint a damaged panel months later, matching the original kit becomes much easier, especially for a Kawasaki Ninja ZX-6R 2009-2012 that has been ridden hard.
Refreshing an older bike: vinyl, laminate and fitting on the Kawasaki Ninja ZX-6R 2009-2012
A bike from this period is more than a decade old, so surface preparation matters. Plastic that has faded or become chalky may not hold adhesive well. Clean with isopropyl alcohol, remove wax and polish, and inspect for cracks or lifting paint. Fix damage before applying film, because vinyl will show every flaw underneath.
Remove old graphics with gentle heat and slow, low-angle pulling. Adhesive residue can be cleaned with a suitable remover, but test it on a hidden spot because older plastic can react. Be patient and avoid sharp tools that could scratch the panel.
Cast vinyl is the safer choice for the compound curves of the nose and lower fairing. A clear laminate protects from fuel, oil and UV. Start from the centre, work air outward and use heat lightly. Take care near the low side exhaust, where heat is stronger, and choose a film suited to the temperature.
On the Kawasaki Ninja ZX-6R 2009-2012, wrap edges around the panel where the shape allows, and give the adhesive a day or two to settle.
Do not rush the cleaning. Dust trapped under the film shows up as small bumps, particularly on glossy colours. Work in a clean room, wipe the panel again just before fitting, and use a fresh squeegee felt so no grit drags across the print.
Mistakes to avoid on the Kawasaki Ninja ZX-6R 2009-2012
The classic error is applying new vinyl over damaged or dirty plastic. The result might look fine for a week, then lift at the edges. Take the time to repair and clean, and the finished kit will last much longer.
- Ignoring cracks or loose paint under the film.
- Ending graphics exactly where the wind hits an edge.
- Using curves where the bodywork asks for angles.
- Forgetting that left and right sides differ around the exhaust.
- Choosing a thin film that creases on the nose.
Another mistake is designing from photographs without measuring. Many used bikes have had fairings replaced, and an aftermarket panel may be slightly different. Measure and compare before you print.
Finally, do not overload a small bike with detail. A supersport of this size looks best with a clear idea, a limited palette and strong contrast.
A last warning concerns cheap film. On a bike with a long life ahead, saving a little on material often means reprinting. Choose a film and laminate designed for vehicle use on your Kawasaki Ninja ZX-6R 2009-2012, and buy enough for a spare piece or two.
Choosing the right Kawasaki Ninja ZX-6R 2009-2012 for your project
Because the ZX-6R has many generations, begin with visual clues. The low side exhaust points to the 2009 to 2012 era, while older bikes have an under-seat exhaust. Look at the shape of the nose, the headlights and the tail. Later bikes received new front and side fairings, so the face of the bike differs.
Check what has been replaced. Fairings from other sources, a different screen or a race tail can change the outline. If the bike has been repaired after a crash, panels may not match the standard shape.
Measure one side fairing and the tail width, then compare with the template at 1:1. We do not claim that a template for one version fits another. If your Kawasaki Ninja ZX-6R 2009-2012 has unusual parts, send photographs to the shop first.
Write down what you find, add photographs from several angles, and keep them with your order. That short checklist makes it much easier to choose the right design for the Kawasaki Ninja ZX-6R 2009-2012 and to explain it to a printer.
How This Template Is Built
This Kawasaki Ninja ZX-6R 2009-2012 vector template is rebuilt as a fully editable vector outline from the real panel proportions of the Kawasaki Ninja ZX-6R 2009-2012, rather than a rough tracing or a stretched photo. Working at true 1:1 scale means printers and installers can output panels straight from the file without rescaling, which keeps stripes, sponsor logos and pinstripes aligned exactly where they were designed.
Because the panel outlines are kept as separate, editable shapes, you can turn individual sections on or off while you design and export only the panels you actually need for production. On a vehicle of this kind (sport bike), the typical panel groups include the tank cover, fairings, side panels and tail section. Before printing, always measure a panel on the real vehicle against the file, since small production differences can happen and a quick check avoids a costly reprint.
What You Can Use This Template For
- Full or partial vinyl wrap layouts
- Decal and sticker kits
- Custom liveries
- Tank and fairing graphics
- Sponsor logo and branding placement
This Kawasaki Ninja ZX-6R 2009-2012 vector template suits riders planning a full wrap or a partial decal kit, wrap shops quoting jobs sight-unseen, and sticker manufacturers who need a reliable base file instead of starting from photographs. Because the panel outlines are separated rather than merged into one flattened shape, you can isolate a single panel and export only what you need, which saves time when a project only touches part of the vehicle.

Files Included and How to Use Them
After purchase you get an instant digital download of the Kawasaki Ninja ZX-6R 2009-2012 vector template in three formats. A typical workflow takes only a few steps:
- Download the file from your account or order email right after payment.
- Open the AI, PDF or CorelDRAW version in your vector software.
- Hide the panels you do not need and place your graphics, logos and colors on the rest.
- Print one test panel at 1:1 and check it against the real vehicle.
- Export the final artwork for your printer or cutter.
Printing, Scale and File Notes
Before you print this Kawasaki Ninja ZX-6R 2009-2012 vector template, remember that it is built at real 1:1 scale, so the safest workflow is to print a single test panel first and lay it against the actual Kawasaki Ninja ZX-6R 2009-2012 before committing to a full print run. A short test print is cheap insurance against a wasted roll of vinyl, especially around curved sections.
The vector layers are grouped by panel, which keeps the file manageable if you only need a subset of the panels, useful for a partial wrap, a single panel graphic or a small decal pack. If you run into a fitment question that is not covered here, reach out before you print. We would rather answer a quick question in advance than have you reprint a panel.
Also in our catalog: Kawasaki Ninja ZX-6R 2019-2023 Vector Template, Kawasaki Ninja ZX-10R 2016-2020 Vector Template, Kawasaki Ninja Z1000 SX 2020-2024 Vector Template, Kawasaki Z900 2025-2026 Vector Template, Kawasaki Z750 2007-2014 Vector Template, Kawasaki Z1000 2014-2023 Vector Template.
Browse all Kawasaki vector templates.
Moto Template Pro is an independent design resource and is not affiliated with, endorsed by, or sponsored by Kawasaki or any manufacturer.
Which model years does this Kawasaki Ninja ZX-6R 2009-2012 vector template cover?
This template is built specifically for the Kawasaki Ninja ZX-6R 2009-2012.
Is it worth refreshing an older Kawasaki Ninja ZX-6R 2009-2012 with vinyl instead of repainting?
Often yes. Vinyl is removable, reversible and faster than paint, and it can hide minor flaws if the panels are in decent shape. It does not replace repair work on cracks or deep damage. For a bike with original paint underneath, it also protects the surface and keeps options open for the future.
How can I remove old graphics from a Kawasaki Ninja ZX-6R 2009-2012 without damaging the plastic?
Warm the film gently with a heat gun on low, then peel slowly at a low angle so the adhesive comes with it. Remove leftover glue with a mild remover tested on a hidden area first. Avoid metal blades, and never overheat older plastic, which can warp or become brittle.
What kind of design fits the sharp lines of the Kawasaki Ninja ZX-6R 2009-2012?
Choose geometry: wedges, diagonal blocks, parallel stripes and angular cuts that follow the fairing edges. Keep curves for contrast. A limited palette, two or three colours with strong contrast, looks purposeful on this body. Add a number on the nose or tail if you want a race-inspired feel.
Is heat from the side exhaust a problem for graphics on the Kawasaki Ninja ZX-6R 2009-2012?
It can be around the lower right area, so choose a film suited to the temperature and avoid placing delicate details right next to hot parts. Use a laminate recommended by your supplier, ask them about temperature limits and let the bike cool completely before cleaning or adjusting the film.
My Kawasaki Ninja ZX-6R 2009-2012 has non-original fairings. Can I still plan a design?
Yes, but verify first. Measure the real panels and compare them with the outlines at 1:1. If they differ, adjust the artwork to the actual shape. We do not claim that templates match aftermarket parts, so a quick check with a printout saves time and material.
Is this template compatible with other models?
No. Each model and generation has different bodywork, so this template is specific to this platform and differs from every other template in our catalog.
What file formats are included?
The template is provided in Adobe Illustrator, PDF and CorelDRAW, all as editable vector layers rather than a flattened image.
How is the file delivered?
As an instant digital download available immediately after purchase, with no physical items shipped and no waiting on a production schedule.
Is this an official Kawasaki product?
No. Moto Template Pro is an independent business, not affiliated with Kawasaki.

Kawasaki Ninja ZX-10R 2016-2020 Vector Template
KAWASAKI NINJA ZX-6R 636 2019-2023 ZX6R Vector Template

Kawasaki Z900 2025-2026 Vector Template

Kawasaki ZX10R 2011-2015 Vector Template


Reviews
There are no reviews yet.