

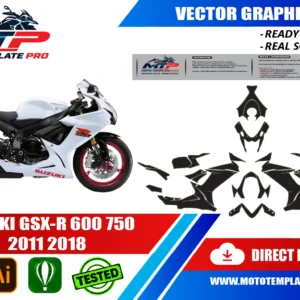

This Suzuki GSX-R 600 750 2011-2018 vector template reproduces the Suzuki GSX-R 600 750 2011-2018 at real scale (1:1) as an editable vector file.
Table of Contents
Suzuki GSX-R 600 750 2011-2018 Vector Template: Overview
Use this Suzuki GSX-R 600 750 2011-2018 vector template as an accurate base for decal kits, vinyl wraps, custom liveries and other graphics on the Suzuki GSX-R 600 750 2011-2018. It is made for graphic designers, wrap installers and sticker manufacturers.
The Suzuki GSX-R 600 750 2011-2018 template covers the long-running generation of the GSX-R600 and GSX-R750 that began with a major redesign for the 2011 model year. Lighter, shorter in the wheelbase and simpler in its bodywork, this generation became a familiar sight at track days and in club racing.
That use shapes how people decorate it. A track bike needs a livery that reads at speed, repairs quickly after a spill and can be renewed every season. A kit drawn for the Suzuki GSX-R 600 750 2011-2018 gives club racers, track-day riders and wrap installers an exact base for race numbers, class colours and full liveries.
The files are editable vector outlines at real 1:1 scale in AI, PDF and CorelDRAW, with layers grouped by part. They are a starting point for your own artwork, not finished artwork and not a physical decal kit. You choose the concept, the colours and the finish.

The template is provided as an editable vector file, compatible with Adobe Illustrator, PDF and CorelDRAW. It is a starting point for your own design work rather than a finished, ready-to-print graphic: a precise outline of the panels that you can use to position decals, plan a wrap layout or prepare a sticker kit at the correct scale. For background on why vector files are the standard for wrap and decal production, see the Adobe comparison of raster and vector formats.
From the 2011 redesign to 2018: the Suzuki GSX-R 600 750 2011-2018 timeline
The sources we checked agree that the 2011 models were a significant update for both bikes. The GSX-R600 was reported as about 20 lb lighter and the GSX-R750 nearly 18 lb lighter, with a wheelbase shortened by 15 mm after the engine was rotated back by three degrees. The front end moved up too, with a Showa Big Piston Fork and Brembo monobloc radial calipers. The Suzuki GSX-R 600 750 2011-2018 range is defined by this redesign, which carries the factory code L1.
The bodywork was described as simpler and more aerodynamic, the headlight and bodywork together lost close to nine pounds, the seat became narrower and the rear of the fuel tank was reshaped. The instrument cluster was said to take its cue from the GSX-R1000, and one source lists a back-torque-limiting clutch on the 750.
After 2011 the picture is less clear. Our sources give engine and price figures for 2014 and for 2015 to 2017, but we did not find a verified list of visual changes year by year, and we did not verify whether ABS or other equipment affected any panel. One source says the 2011 redesign continues to the present, so treat 2012 to 2018 as one body family and check small differences, such as colours and graphics, on your own bike.
The bikes sold from 2008 to 2010 have different bodywork, which is why this template starts at 2011.
Panel by panel on the Suzuki GSX-R 600 750 2011-2018
The nose carries the headlight and the air intake, and its shape runs back into the screen. The two side fairings make up the largest surfaces, and the lower fairing, or belly pan, wraps the underside and is the part most exposed to stones and fluid. Because the 2011 bodywork was simplified, the surfaces are relatively clean, which suits bold shapes and long lines.
At the rear, the seat unit ends in a short tail with small side panels. The front fender and the rear hugger are separate pieces. Depending on the exact bike, check how the tank is covered and where the fairing meets it before drawing across that line.
Panels worth planning around
- Nose: the natural home of the front number, visible to marshals and to riders behind.
- Side fairings: the main canvas for the livery and for a second number.
- Belly pan: the hardest-working panel, so keep delicate details off it.
- Tail: the place for the rear number and a repeated team mark.
Layers are grouped by part, so you can focus on one panel at a time. Photograph each real panel flat against a wall with a ruler beside it, and compare it with the Suzuki GSX-R 600 750 2011-2018 outlines.
Track bikes often lose some parts altogether, such as mirrors, indicators or the licence plate bracket, and many teams fit a one-piece or fibreglass fairing set instead of the standard plastics. If that applies to your bike, trace the shape of the fitted parts instead of relying on the standard outline.
Track-day and club-racing livery ideas for the Suzuki GSX-R 600 750 2011-2018
Start from legibility. A number that is thin, curved or low in contrast disappears at speed, so use a heavy typeface, a strong colour contrast and a plate shape that sits flat on the nose and the tail. Check your organiser’s rules for number size, colours and positions before you finalise anything, because requirements differ between events.
On the Suzuki GSX-R 600 750 2011-2018, a livery that follows the long lines of the side fairings looks fast even in the pits. Try a single diagonal band that starts low at the tail and rises toward the nose, or two parallel stripes that split at the belly pan. A high-contrast pairing, such as white on deep blue or yellow on black, remains readable in poor light.
If you run several bikes, make a team set: the same layout in a different colour for each rider, so the group is recognisable at once. A bright accent on the nose helps you spot your own bike in a crowded paddock.
Keep the palette to two or three colours, which also keeps repairs affordable. Use invented sponsor-style blocks rather than copying brands, and keep large flat areas where a spare piece is easy to cut.
Think about paddock photographs too. A livery with a strong silhouette, such as a large contrasting block on the tail or a bold colour on the belly pan, photographs well from the side and from the front three-quarter. Test the artwork by shrinking it on screen to the size of a thumbnail: if the number and the main shapes are still clear, the design will work at a distance.
Cutting a repeatable race kit from the Suzuki GSX-R 600 750 2011-2018 template
Open the file at 100 percent, print the nose and a side fairing, and hold the paper against the bike. The Suzuki GSX-R 600 750 2011-2018 outlines are at real 1:1 scale, so what you see should match what you measure. If it does not, check printer scaling first, then check for replaced or race bodywork.
For a race bike, build the artwork in modules. Keep the number plates on their own layer, separate from the livery, so you can change a number for a new season without redrawing the bike. Keep the original contours on a locked layer, add a bleed of a few millimetres where the film wraps, and place the cut path on its own spot-colour layer. Convert text to outlines.
Split the biggest pieces to fit the width of your plotter, and hide the seams along natural lines such as panel joins. Add registration marks, name each piece by panel and side, and cut a spare set of the parts most likely to be damaged: the nose, the lower fairing and the tail.
Print a small proof on the real film first, then tape a paper pattern to the bike and check position and symmetry before cutting expensive material.
Keep a file for each season, named with the date, the film brand and the laminate, so you can reproduce the same kit after a crash or a change of fairings.
Vinyl, laminate and edge sealing for the Suzuki GSX-R 600 750 2011-2018 on track
Track use is demanding. Fuel splash, chain lube, heat and flying grit all attack the film, so choose a cast vinyl with a durable clear laminate from a reputable supplier, and follow the data sheet for temperature and cleaning. Ask the supplier about suitability for motorsport use rather than assuming it.
Preparation matters most. Clean with isopropyl alcohol, remove wax and polish, and repair cracks and chips first. Work in a clean room, start from the centre and push air outward. Wrap edges around the panel where the shape allows, and press the borders firmly so the wind cannot get underneath.
On the Suzuki GSX-R 600 750 2011-2018, the nose and the lower fairing take the most abuse. Consider a clear protective film over those areas, or plan to replace the graphics there more often. Let the adhesive settle for a day or two before the first ride, and avoid aiming a pressure washer at the edges.
Take a spare roll end of the same batch to the circuit, because a repair piece cut from another batch may not match the colour.
After each event, wash the bike with a gentle soap and a soft cloth, check the edges for lifting and press them down again at once. A small lift caught early costs a few minutes, while a lift left alone can be pulled away by the wind in a single lap.
Mistakes to avoid on the Suzuki GSX-R 600 750 2011-2018
The commonest mistake is designing for the screen. A scheme that looks great as a flat drawing can disappear on a curved panel at speed. Print at 1:1, tape it to the bike and look at it from several metres away.
- Choosing thin or decorative numbers that cannot be read quickly.
- Ignoring the organiser’s rules for number colours and positions.
- Running delicate details across the belly pan.
- Using a thin film that creases or tears on compound curves.
- Skipping the spare set and the notes about bleed and laminate.
Another mistake is assuming that race bodywork matches the standard outline. Many track bikes carry replacement fairings made of other materials, and their shape can differ slightly. Measure and compare before printing.
Finally, avoid cheap film. A small saving on material can mean re-doing the whole bike after one wet weekend.
Do not forget that a crash tends to damage the same areas again and again. Plan the design so that the nose, the lower fairing and the tail are separate pieces that you can replace without touching the rest of the bike, and keep the cut files ready. A livery designed in modules turns a major repair into an afternoon of work.
Last, avoid over-designing. A club racer needs a clean number, a clear idea and a livery that survives a season, not a complicated collage that nobody can read at speed.
Choosing the Suzuki GSX-R 600 750 2011-2018 against the earlier and later bikes
Begin with the face and the tail. If your bike has the simplified bodywork introduced in 2011, this is the right family. The bikes of 2008 to 2010 have different bodywork, and we did not verify whether any later redesign exists after 2018, so check the bike you actually own.
The GSX-R600 and the GSX-R750 are included. One source says the 750 is nearly identical to the 600 apart from engine, price and colour schemes, but we did not verify every measurement, so compare the outline with the real panels at 1:1.
Check what has been replaced. Race fairings, a different screen or a repaired panel can change the outline, and compatibility can vary with exact variant, year and aftermarket parts. We do not claim that the file fits every bike.
Write down your findings and keep photographs from several angles before you order, so you can explain the project to a printer.
If you are unsure between two templates, compare the nose, the tail and the shape of the seat unit, then print the outline at 1:1 and test it. A paper test costs almost nothing and tells you more than any list of years. For a bike with a heavy history of repairs, send photographs to the shop first.
How This Template Is Built
This Suzuki GSX-R 600 750 2011-2018 vector template is rebuilt as a fully editable vector outline from the real panel proportions of the Suzuki GSX-R 600 750 2011-2018, rather than a rough tracing or a stretched photo. Working at true 1:1 scale means printers and installers can output panels straight from the file without rescaling, which keeps stripes, sponsor logos and pinstripes aligned exactly where they were designed.
Because the panel outlines are kept as separate, editable shapes, you can turn individual sections on or off while you design and export only the panels you actually need for production. On a vehicle of this kind (sport bike), the typical panel groups include the tank cover, fairings, side panels and tail section. Before printing, always measure a panel on the real vehicle against the file, since small production differences can happen and a quick check avoids a costly reprint.
What You Can Use This Template For
- Full or partial vinyl wrap layouts
- Decal and sticker kits
- Custom liveries
- Tank and fairing graphics
- Sponsor logo and branding placement
This Suzuki GSX-R 600 750 2011-2018 vector template suits riders planning a full wrap or a partial decal kit, wrap shops quoting jobs sight-unseen, and sticker manufacturers who need a reliable base file instead of starting from photographs. Because the panel outlines are separated rather than merged into one flattened shape, you can isolate a single panel and export only what you need, which saves time when a project only touches part of the vehicle.

Files Included and How to Use Them
After purchase you get an instant digital download of the Suzuki GSX-R 600 750 2011-2018 vector template in three formats. A typical workflow takes only a few steps:
- Download the file from your account or order email right after payment.
- Open the AI, PDF or CorelDRAW version in your vector software.
- Hide the panels you do not need and place your graphics, logos and colors on the rest.
- Print one test panel at 1:1 and check it against the real vehicle.
- Export the final artwork for your printer or cutter.
Printing, Scale and File Notes
Before you print this Suzuki GSX-R 600 750 2011-2018 vector template, remember that it is built at real 1:1 scale, so the safest workflow is to print a single test panel first and lay it against the actual Suzuki GSX-R 600 750 2011-2018 before committing to a full print run. A short test print is cheap insurance against a wasted roll of vinyl, especially around curved sections.
The vector layers are grouped by panel, which keeps the file manageable if you only need a subset of the panels, useful for a partial wrap, a single panel graphic or a small decal pack. If you run into a fitment question that is not covered here, reach out before you print. We would rather answer a quick question in advance than have you reprint a panel.

Also in our catalog: Suzuki GSX-R 600 750 2006-2007 Vector Template, Suzuki GSX-R 600 750 K8 K9 2008-2010 Vector Template, Suzuki GSX-R 1000 2007-2008 Vector Template, Suzuki GSXR 600 750 K8 K9 2008-2010 Vector Template, Suzuki GSX-R 1000 2017-2024 Vector Template, TM 125-144-250-300 2 Stroke 2022 2025 Vector Template.
Browse all Suzuki vector templates.
Moto Template Pro is an independent design resource and is not affiliated with, endorsed by, or sponsored by Suzuki or any manufacturer.
Which model years does this Suzuki GSX-R 600 750 2011-2018 vector template cover?
This template is built specifically for the Suzuki GSX-R 600 750 2011-2018.
What changed on the Suzuki GSX-R 600 750 2011-2018 compared with earlier bikes?
Sources describe the 2011 models as a major update: lighter, a shorter wheelbase, simpler bodywork, a narrower seat and a revised tank. We did not verify year-by-year visual changes from 2012 to 2018, so compare your own panels with the outline at 1:1.
Can I design race numbers and a club-racing livery with the Suzuki GSX-R 600 750 2011-2018 template?
Yes. The vector outlines give you the real panel shapes, so you can draw number plates and a full livery on them. Check your organiser’s rules for number size, colours and positions, and keep the numbers on their own layer.
What vinyl should I choose for track days on a Suzuki GSX-R 600 750 2011-2018?
Choose cast vinyl with a durable clear laminate, and ask the supplier about suitability for motorsport. Wrap edges where possible, seal borders firmly and let the adhesive settle before riding. Consider a clear protective film on the nose and the lower fairing.
Do the same outlines work for the GSX-R600 and GSX-R750 in the Suzuki GSX-R 600 750 2011-2018 range?
The template is listed for both, and one source calls the bikes nearly identical in body, but we do not guarantee a fit for every variant. Print the nose and a side fairing at 1:1 and test them on your bike first.
Is the Suzuki GSX-R 600 750 2011-2018 template a ready-made decal kit?
No. It is a digital file with editable vector outlines at real 1:1 scale in AI, PDF and CorelDRAW, with layers grouped by part. You design the graphics, then print and cut them on your own vinyl. Nothing physical is shipped.
Is this template compatible with other models?
No. Each model and generation has different bodywork, so this template is specific to this platform and differs from every other template in our catalog.
What file formats are included?
The template is provided in Adobe Illustrator, PDF and CorelDRAW, all as editable vector layers rather than a flattened image.
How is the file delivered?
As an instant digital download available immediately after purchase, with no physical items shipped and no waiting on a production schedule.
Is this an official Suzuki product?
No. Moto Template Pro is an independent business, not affiliated with Suzuki.
Suzuki GSX-R 1000 2007-2008 Vector Template
Suzuki GSX-R 600 750 2006-2007 Vector Template

SUZUKI GSXR 600 750 K8 K9 2008-2010 Vector Template

Suzuki RMZ 450 2024-2025 Vector Template


Reviews
There are no reviews yet.