



This Kawasaki KXF 250 KX 250F 2009-2012 vector template reproduces the Kawasaki KXF 250 KX 250F 2009-2012 at real scale (1:1) as an editable vector file.
Table of Contents
Kawasaki KXF 250 KX 250F 2009-2012 Vector Template: Overview
Use this Kawasaki KXF 250 KX 250F 2009-2012 vector template as an accurate base for decal kits, vinyl wraps, custom liveries and other graphics on the Kawasaki KXF 250 KX 250F 2009-2012. It is made for graphic designers, wrap installers and sticker manufacturers.
The Kawasaki KXF 250 KX 250F 2009-2012 template is built for the generation of 250 cc four-stroke motocross bikes that moved Kawasaki from carburettors to fuel injection. Our outlines follow the real body panels at full size, so a decal kit or wrap can start from true shapes instead of guesswork.
Each file contains editable vector contours of the body panels at real 1:1 scale, in AI, PDF and CorelDRAW formats, with layers grouped by part. It is a starting point for your own design, not a finished artwork ready to print. Designers, wrap installers and sticker makers use it as a precise drawing board.
Club racers rarely have a factory budget, but they do have a bike that is washed, dropped and photographed every weekend. Matching your artwork to the outline of the Kawasaki KXF 250 KX 250F 2009-2012 before you cut saves vinyl, time and arguments in the paddock.
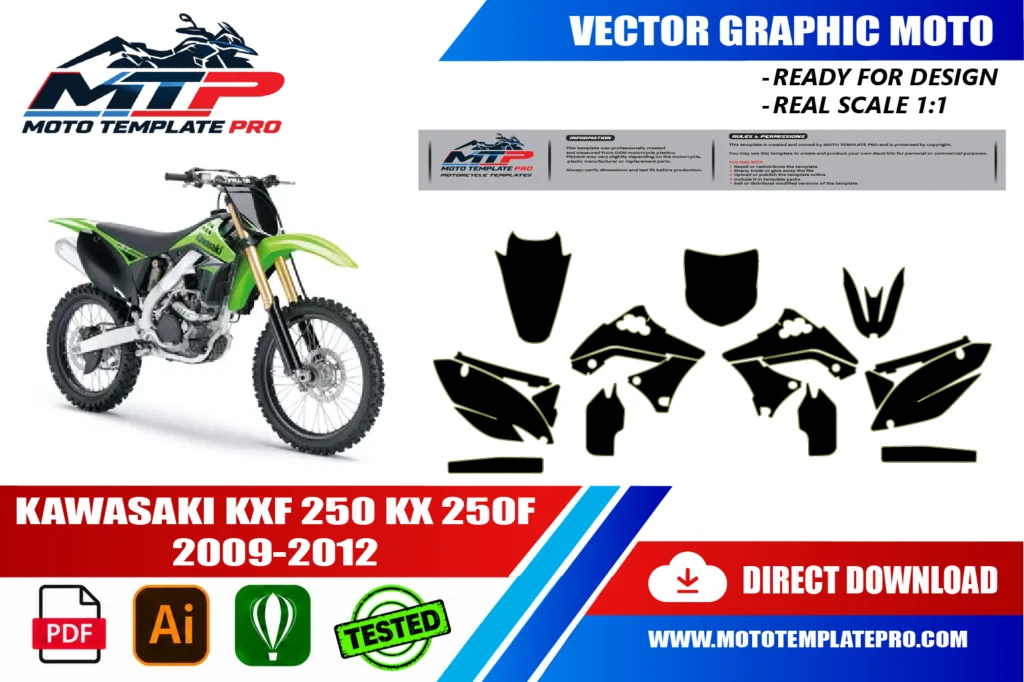
The template is provided as an editable vector file, compatible with Adobe Illustrator, PDF and CorelDRAW. It is a starting point for your own design work rather than a finished, ready-to-print graphic: a precise outline of the panels that you can use to position decals, plan a wrap layout or prepare a sticker kit at the correct scale. For background on why vector files are the standard for wrap and decal production, see the Adobe comparison of raster and vector formats.
How the Kawasaki KXF 250 KX 250F 2009-2012 generations unfolded
The KX250F first appeared as a 2004 model, and the Kawasaki KXF 250 KX 250F 2009-2012 template covers the stretch that begins with the 2009 redesign. Dirt Rider’s tech briefing for 2009 described all-new bodywork and graphics, a new aluminium perimeter frame about 2.2 lb lighter than the 2008 one, a new swingarm and a new 249 cc engine. The shrouds and side number plates were described as one-piece, two-tone mouldings, and the right side panel gained a passage to help cool the silencer.
From carburettor to injection
A Motocross Action test says the 2010 bike was still carburetted, with changes aimed at handling. For 2011 the KX250F switched to digital fuel injection and to Showa’s separate function fork, which keeps the spring in one leg and the damping in the other. The same test mentions grippier material on the sides of the seat cover. A report on the 2012 model describes a second injector, a reshaped air boot, a more wear-resistant seat, new graphics and blue accents on the oil cap and engine plugs.
What we could not verify is whether the plastics were reshaped between 2009 and 2012. The sources we read talk about engines, suspension and graphics, not panel outlines, so compare your own bike. The Kawasaki KXF 250 KX 250F 2009-2012 reads best as one generation with several mechanical and graphic updates, not as four unrelated bikes.
Body panels of the Kawasaki KXF 250 KX 250F 2009-2012, named one by one
Here is what you will decorate, in plain words. On the Kawasaki KXF 250 KX 250F 2009-2012 the front number plate sits above the headstock and the front fender is the slim mudguard over the wheel. The radiator shrouds, sometimes called scoops, wrap the sides of the tank area and guide air to the radiators. The side number plates cover the flanks around the airbox, and the airbox cover gives access to the filter.
- Front number plate and front fender
- Radiator shrouds, left and right
- Side number plates and airbox cover
- Rear fender and tail section
The seat has its own grippy cover, which should not receive a decal. At the back, the rear fender forms a long, narrow surface that holds the number zone. Read the product description for the exact list of parts that are drawn, because the files cover the plastics, not every bolt-on part.
Since the original shrouds and side plates were described as two-tone mouldings, the colour split on the factory plastic follows moulded edges. Those edges are natural limits for a stripe, so decide early whether your vinyl respects them or covers them.
A useful habit is to photograph each panel straight on, with a ruler beside it, and compare the picture with the outline before designing. This reveals holes, cut-outs and mounting tabs that sit elsewhere than you expected on your Kawasaki KXF 250 KX 250F 2009-2012.
Club-racer livery ideas for the Kawasaki KXF 250 KX 250F 2009-2012
A club championship rewards a bike that is recognisable from the start gate and cheap to repair. The Kawasaki KXF 250 KX 250F 2009-2012 has long, fairly flat side plates and narrow shrouds, so a club livery works best with a few big shapes and one clear number zone.
Directions to try
- Club colours: the two club colours split along the shroud edge, with the club name along the rear fender.
- Sponsor wall: neat rectangles of equal height on the side plates, each with a safe margin.
- Retro blocks: bold geometric shapes and chequered bands inspired by motocross of the 2000s.
- One-event special: a bright accent colour for a single race day, easy to peel and replace.
A 2012 report mentions blue accents on the engine plugs and suspension adjusters, a reminder that a small contrast colour can sit well on this machine. We did not verify the plastic colour of every year, so decide whether your film covers the plastic fully or lets the base colour show.
Keep the number zone clear and high in contrast. Club rules differ for number size and colour, so read your regulations first. Also think about repairs: a rider who replaces one panel after a crash is happier with a design built from panels that can each be reprinted on their own, with intentional breaks at the seams.
From vector outline to cut file for the Kawasaki KXF 250 KX 250F 2009-2012
Think of the job as a short production line. First, open the vector file and switch off every layer except the panel you are working on. The contours of the Kawasaki KXF 250 KX 250F 2009-2012 are grouped by part, so a shroud can be finished without nudging the fender. Name each layer after the part and side, then lock it when the artwork is approved.
Next, extend the artwork beyond the outline by 3 to 5 mm on every edge. This bleed gives the plotter or printer a margin for small registration errors and stops thin white gaps along the edge. Keep names, numbers and sponsor logos inside a safe zone, clear of screw holes, vents and the edges that fold under.
Colour deserves its own check. Use the profile supplied by your print shop, often CMYK, and reserve a single spot colour for cut paths so the machine never mistakes artwork for a contour. Then export three files: a layered master, a cut-only file for the plotter and a flattened proof for approval.
Before touching vinyl, measure a known distance on the artboard and compare it with the real panel. Print a paper test at actual size, tape it onto the bike and look at it from the side, from above and from the rider’s seat. On a Kawasaki KXF 250 KX 250F 2009-2012 this takes a few minutes and exposes scale errors early.
For a club, keep one master and change only the number, the rider name and the sponsor row. Reprints after a crash then take minutes instead of an evening.
Weatherproof vinyl for a bike that races every weekend
A club bike meets sun in the car park, mud on the track and a pressure washer on Sunday night. Choose cast vinyl for curved areas such as the shrouds and the front fender, since it relaxes and follows the shape without pulling back. Calendered film is stiffer and cheaper, and it behaves well on flatter plastics like the side number plates.
Add a clear overlaminate with UV protection. A satin finish hides fine scratches better than gloss, while a very flat matt can look dull once dust settles. Let printed ink degas before laminating, following your film maker’s guidance.
Clean every plastic with isopropyl alcohol and avoid silicone sprays and shiny protectants, which stop the adhesive from gripping. Apply from the centre outward with a squeegee and use gentle heat only where the film must stretch around a radius. Too much heat dulls the finish or shrinks the film back.
Wrap edges around the rim of the panel whenever the shape allows, then give the adhesive a full day before the first wash. Later, keep the pressure washer lance away from corners and seams, because water driven under an edge lifts vinyl fast.
Finally, keep a strip of spare film from the same batch. A club racer who crashes in round three will be glad to reprint one shroud that matches the rest.
Mistakes that spoil a club decal kit
Most failed kits come from a short list of avoidable errors. The first is designing on a flat screen without picturing the curves: a logo that is perfect in a vector program can stretch where it crosses a deep radius. The second is ignoring fasteners and openings, so keep text and faces away from screws, clips and vents. The third is placing important details too close to an edge, where boots scuff them.
- Skipping the paper test at real size
- Printing without bleed, which leaves thin white gaps
- Putting decals on the grippy seat cover
- Using sponsor text so small that nobody can read it from the fence
- Copying the left panel instead of drawing a true right panel
A mistake typical of club projects is leaving everything to the night before the race. Vinyl needs a day to bond, and a rushed application traps dust and bubbles. Plan the job for midweek and treat the first wash with care.
Be wary of screenshots and phone photos taken at an angle, because they distort proportions. Take dimensions from the real panel or from the 1:1 outline itself.
2009, 2010, 2011 or 2012: which Kawasaki KXF 250 KX 250F 2009-2012 do you have?
The Kawasaki KXF 250 KX 250F 2009-2012 is not one single bike. The sources we read describe a redesign for 2009, a carburetted bike in 2010, fuel injection and a new fork in 2011, and a second injector with new graphics in 2012. We did not verify whether the plastics were reshaped between those years, so do not assume that they are identical or different.
Check three points on your own machine: the radiator shrouds, the side number plates with the airbox cover, and the rear fender. Stand in front, then at the side, and photograph each panel straight on with a ruler beside it. Compare the pictures with the product description before ordering.
Ask also whether your plastics are original. Bikes of this age have often had replacement or aftermarket panels fitted after a crash, so the panels on a used machine may not match its registration year. The range in the product name follows the template listing, and compatibility can vary with exact variant, year and aftermarket parts.
Treat bikes outside the range with caution. The 2009 bike came with a new frame and new bodywork, and one source describes the 2013 model as revamped with a new look, so verify the panels before using this outline on a different year.
Kawasaki is a trademark of its owner. This template is an independent drawing aid, not an official or approved file.
How This Template Is Built
This Kawasaki KXF 250 KX 250F 2009-2012 vector template is rebuilt as a fully editable vector outline from the real panel proportions of the Kawasaki KXF 250 KX 250F 2009-2012, rather than a rough tracing or a stretched photo. Working at true 1:1 scale means printers and installers can output panels straight from the file without rescaling, which keeps stripes, sponsor logos and pinstripes aligned exactly where they were designed.
Because the panel outlines are kept as separate, editable shapes, you can turn individual sections on or off while you design and export only the panels you actually need for production. On a vehicle of this kind (motocross or off-road bike), the typical panel groups include the front fender, radiator shrouds, side number plates, airbox cover and rear fender. Before printing, always measure a panel on the real vehicle against the file, since small production differences can happen and a quick check avoids a costly reprint.
What You Can Use This Template For
- Motocross decal and graphics kits
- Race team and sponsor graphics
- Number plate and rider name designs
- Full or partial vinyl wrap layouts
- Custom race liveries
This Kawasaki KXF 250 KX 250F 2009-2012 vector template suits race teams and riders preparing a new graphics kit, wrap shops quoting jobs sight-unseen, and sticker manufacturers who need a reliable base file instead of starting from photographs. Because the panel outlines are separated rather than merged into one flattened shape, you can isolate a single panel and export only what you need, which saves time when a project only touches part of the vehicle.

Files Included and How to Use Them
After purchase you get an instant digital download of the Kawasaki KXF 250 KX 250F 2009-2012 vector template in three formats. A typical workflow takes only a few steps:
- Download the file from your account or order email right after payment.
- Open the AI, PDF or CorelDRAW version in your vector software.
- Hide the panels you do not need and place your graphics, logos and colors on the rest.
- Print one test panel at 1:1 and check it against the real vehicle.
- Export the final artwork for your printer or cutter.
Printing, Scale and File Notes
Before you print this Kawasaki KXF 250 KX 250F 2009-2012 vector template, remember that it is built at real 1:1 scale, so the safest workflow is to print a single test panel first and lay it against the actual Kawasaki KXF 250 KX 250F 2009-2012 before committing to a full print run. A short test print is cheap insurance against a wasted roll of vinyl, especially around curved sections.
The vector layers are grouped by panel, which keeps the file manageable if you only need a subset of the panels, useful for a partial wrap, a single panel graphic or a small decal pack. If you run into a fitment question that is not covered here, reach out before you print. We would rather answer a quick question in advance than have you reprint a panel.

Also in our catalog: Kawasaki Ninja Z1000 SX 2020-2024 Vector Template, Kawasaki Versys 650 2008 Vector Template, Kawasaki Z650 2020-2022 Vector Template, Kawasaki Z900 2020-2024 Vector Template, Kawasaki Z900 2017-2019 Vector Template, Kawasaki Z1000 2014-2023 Vector Template.
Browse all Kawasaki vector templates.
Moto Template Pro is an independent design resource and is not affiliated with, endorsed by, or sponsored by Kawasaki or any manufacturer.
Which model years does this Kawasaki KXF 250 KX 250F 2009-2012 vector template cover?
This template is built specifically for the Kawasaki KXF 250 KX 250F 2009-2012.
Which panel is the best first project on a Kawasaki KXF 250 KX 250F 2009-2012?
Start with the side number plates: they are fairly flat, easy to reach and carry few fasteners. Practise your method there, then move on to the shrouds and the front fender, whose curves are more demanding. Leave the tail section for last and write left or right in every layer name so nothing is mirrored by accident.
Do the carburettor and fuel-injected years of the Kawasaki KXF 250 KX 250F 2009-2012 need different templates?
We did not verify whether the plastics changed when fuel injection arrived in 2011, only that the engine and fork did. Compare your own panels with the outline and the product description before printing, looking closely at the shrouds and airbox cover. Compatibility can vary with exact variant, year and aftermarket parts.
How can I use club colours on a Kawasaki KXF 250 KX 250F 2009-2012 without a full wrap?
Treat the original plastic as a base colour and add vinyl only where it counts: a block on each shroud, the side plates and the number zone. Use the moulded edges as limits for stripes, and test your colours outdoors on a small sample before printing the whole kit.
Will vinyl survive weekly washing on a Kawasaki KXF 250 KX 250F 2009-2012?
Yes, if you use quality cast vinyl with a UV overlaminate and edges wrapped around the rim. Let the adhesive cure for a day before the first wash and keep the pressure washer away from seams. A hard crash can still tear a panel, so keep spare film from the same batch.
How large should the race number be on a Kawasaki KXF 250 KX 250F 2009-2012?
Large, simple digits on a high-contrast background stay readable at a distance and through dust. Club and series rules differ for size and colour, so read your regulations before printing, and keep the digits away from screws and vents.
Is this template compatible with other models?
No. Each model and generation has different bodywork, so this template is specific to this platform and differs from every other template in our catalog.
What file formats are included?
The template is provided in Adobe Illustrator, PDF and CorelDRAW, all as editable vector layers rather than a flattened image.
How is the file delivered?
As an instant digital download available immediately after purchase, with no physical items shipped and no waiting on a production schedule.
Is this an official Kawasaki product?
No. Moto Template Pro is an independent business, not affiliated with Kawasaki.
Kawasaki KLX 150 2013-2015 Vector Template
Kawasaki KX 450 2024-2025 Vector Template
YAMAHA YZ 125 250 2015 2021 Vector Template

Yamaha YZ80 1993 - 2001 Vector Template


Reviews
There are no reviews yet.